<?xml version="1.0" encoding="utf-8"?><feed xmlns="http://www.w3.org/2005/Atom" ><generator uri="https://jekyllrb.com/" version="3.10.0">Jekyll</generator><link href="/blog/feed.xml" rel="self" type="application/atom+xml" /><link href="/" rel="alternate" type="text/html" /><updated>2025-02-24T09:45:39+00:00</updated><id>/blog/feed.xml</id><title type="html">CodeMyst</title><subtitle>Hello! I&apos;m CodeMyst, a software developer that likes to play around with everything. I mostly focus on web and game programming. This is my personal portfolio and blog.</subtitle><entry><title type="html">Adding Rubocop to an existing Rails project</title><link href="/add-rubocop" rel="alternate" type="text/html" title="Adding Rubocop to an existing Rails project" /><published>2024-10-18T00:00:00+00:00</published><updated>2024-10-18T00:00:00+00:00</updated><id>/add-rubocop</id><content type="html" xml:base="/add-rubocop"><![CDATA[<hr />

<p>If you’re trying to add Rubocop to an existing project, you might’ve already stumbled upon the <code class="language-plaintext highlighter-rouge">--auto-gen-config</code> option for rubocop. This option will generate a <code class="language-plaintext highlighter-rouge">rubocop_todo.yml</code> configuration, which will allow you to run Rubocop without enforcing all the rules at once, and you can enable them one by one as you resolve them.</p>

<p>This is great, but we wanted to enable all the rules right at the start, so our editors would report all the issues, but we also wanted to add rubocop to the CI pipeline, and we didn’t want the pipeline to be failing until we fixed <em>all</em> of the issues.</p>

<p>So our solution was to create a regular rubocop configuration file that would be used by our editors, and a separate <code class="language-plaintext highlighter-rouge">.rubocop-ci.yml</code> file to be used by the CI pipeline. That second config would extend the first one and exclude all of the files in the codebase which have linting issues. This way, instead of fixing rule by rule, we can fix issues file by file.</p>

<p>So let’s say you’re working on some file where you’re adding a new feature. Now it should be your responsibility to fix all the rubocop issues in that file, and remove it from the exclude list in the <code class="language-plaintext highlighter-rouge">.rubocop-ci.yml</code> file.</p>

<p>One issue with this is that there will probably be a lot of files which won’t be touched for a long while, meaning they won’t be fixed anytime soon. You could plan some sessions in which you will take a chunk of those files, and go through them to fix the issues.</p>

<p>You can also run <code class="language-plaintext highlighter-rouge">rubocop -a</code> to autofix some issues.</p>

<h2 id="configuration-setup">Configuration setup</h2>

<p>After you created the <code class="language-plaintext highlighter-rouge">.rubocop.yml</code> configuration file with the rules you want to use, you can create the <code class="language-plaintext highlighter-rouge">.rubocop-ci.yml</code> file with the following content:</p>

<div class="language-yaml highlighter-rouge"><div class="highlight"><pre class="highlight"><code><span class="na">inherit_from</span><span class="pi">:</span> <span class="s">.rubocop.yml</span>

<span class="na">AllCops</span><span class="pi">:</span>
  <span class="na">Exclude</span><span class="pi">:</span>
    <span class="pi">-</span> <span class="s2">"</span><span class="s">path/to/file/with/linting/issues/**/*"</span>
    <span class="pi">-</span> <span class="s2">"</span><span class="s">another/path/to/file/with/linting/issues/**/*"</span>
</code></pre></div></div>

<p>Now here’s the fun part, generating the list of files with linting issues. Now you can use the <code class="language-plaintext highlighter-rouge">--list-target-files/-L</code> option to list all the files rubocop will inspect, and wrap them in the yaml format like so:</p>

<div class="language-sh highlighter-rouge"><div class="highlight"><pre class="highlight"><code>bundle <span class="nb">exec </span>rubocop <span class="nt">-L</span> | <span class="nb">uniq</span> | <span class="nb">sed</span> <span class="nt">-e</span> <span class="s2">"s/</span><span class="se">\(</span><span class="s2">.*</span><span class="se">\)</span><span class="s2">/- '</span><span class="se">\1</span><span class="s2">'/"</span>
</code></pre></div></div>

<p>This will return a list of files with linting issues, which you can copy and paste into the <code class="language-plaintext highlighter-rouge">.rubocop-ci.yml</code> file.</p>

<p>Now you can run rubocop with this configuration in your CI pipeline, and it will only fail if you introduce new issues in the files that are not excluded.</p>

<div class="language-sh highlighter-rouge"><div class="highlight"><pre class="highlight"><code>bundle <span class="nb">exec </span>rubocop <span class="nt">-c</span> .rubocop-ci.yml
</code></pre></div></div>]]></content><author><name></name></author><summary type="html"><![CDATA[A simple guide on adding Rubocop to an existing (and big) Rails project, with a separate CI configuration for retroactive enforcement]]></summary></entry><entry><title type="html">Debounced callback hook in React (TypeScript)</title><link href="/react-debounced-callback" rel="alternate" type="text/html" title="Debounced callback hook in React (TypeScript)" /><published>2024-05-10T00:00:00+00:00</published><updated>2024-05-10T00:00:00+00:00</updated><id>/react-debounced-callback</id><content type="html" xml:base="/react-debounced-callback"><![CDATA[<hr />

<p>This one is a bit different than your usual <code class="language-plaintext highlighter-rouge">useDebounce</code> hook, instead of debouncing the change of some value, this instead debounces the call to some function. So here’s a simple debounced callback hook in React with TypeScript types:</p>

<div class="language-tsx highlighter-rouge"><div class="highlight"><pre class="highlight"><code><span class="kd">type</span> <span class="nx">UnaryVoidFunction</span><span class="o">&lt;</span><span class="nx">T</span><span class="o">&gt;</span> <span class="o">=</span> <span class="p">(</span><span class="nx">arg</span><span class="p">:</span> <span class="nx">T</span><span class="p">)</span> <span class="o">=&gt;</span> <span class="k">void</span><span class="p">;</span>

<span class="kd">const</span> <span class="nx">useDebouncedCallback</span> <span class="o">=</span> <span class="p">&lt;</span><span class="nx">T</span><span class="p">,</span><span class="o">&gt;</span><span class="p">(</span><span class="nx">func</span><span class="p">:</span> <span class="nx">UnaryVoidFunction</span><span class="o">&lt;</span><span class="nx">T</span><span class="o">&gt;</span><span class="p">,</span> <span class="nx">wait</span><span class="p">:</span> <span class="kr">number</span><span class="p">)</span> <span class="o">=&gt;</span> <span class="p">{</span>
  <span class="kd">const</span> <span class="nx">timeout</span> <span class="o">=</span> <span class="nx">useRef</span><span class="o">&lt;</span><span class="kr">number</span><span class="o">&gt;</span><span class="p">();</span>

  <span class="kd">const</span> <span class="nx">debouncedFunc</span> <span class="o">=</span> <span class="p">(</span><span class="na">arg</span><span class="p">:</span> <span class="nx">T</span><span class="p">)</span> <span class="o">=&gt;</span> <span class="p">{</span>
    <span class="nx">clearTimeout</span><span class="p">(</span><span class="nx">timeout</span><span class="p">.</span><span class="nx">current</span><span class="p">);</span>
    <span class="nx">timeout</span><span class="p">.</span><span class="nx">current</span> <span class="o">=</span> <span class="nx">setTimeout</span><span class="p">(()</span> <span class="o">=&gt;</span> <span class="nx">func</span><span class="p">(</span><span class="nx">arg</span><span class="p">),</span> <span class="nx">wait</span><span class="p">);</span>
  <span class="p">};</span>

  <span class="k">return</span> <span class="nx">useCallback</span><span class="p">(</span><span class="nx">debouncedFunc</span><span class="p">,</span> <span class="p">[</span><span class="nx">func</span><span class="p">,</span> <span class="nx">wait</span><span class="p">]);</span>
<span class="p">};</span>

<span class="kd">const</span> <span class="nx">App</span><span class="p">:</span> <span class="nx">FunctionComponent</span> <span class="o">=</span> <span class="p">()</span> <span class="o">=&gt;</span> <span class="p">{</span>
  <span class="kd">const</span> <span class="p">[</span><span class="nx">searchQuery</span><span class="p">,</span> <span class="nx">setSearchQuery</span><span class="p">]</span> <span class="o">=</span> <span class="nx">useState</span><span class="p">(</span><span class="dl">""</span><span class="p">);</span>

  <span class="kd">const</span> <span class="nx">debouncedSearch</span> <span class="o">=</span> <span class="nx">useDebouncedCallback</span><span class="p">(</span><span class="nx">setSearchQuery</span><span class="p">,</span> <span class="mi">500</span><span class="p">);</span>

  <span class="k">return</span> <span class="p">(</span>
    <span class="p">&lt;</span><span class="nt">div</span><span class="p">&gt;</span>
      <span class="p">&lt;</span><span class="nt">input</span> <span class="na">onChange</span><span class="p">=</span><span class="si">{</span><span class="p">(</span><span class="nx">e</span><span class="p">)</span> <span class="o">=&gt;</span> <span class="nx">debouncedSearch</span><span class="p">(</span><span class="nx">e</span><span class="p">.</span><span class="nx">target</span><span class="p">.</span><span class="nx">value</span><span class="p">)</span><span class="si">}</span> <span class="p">/&gt;</span>
      <span class="p">&lt;</span><span class="nt">div</span><span class="p">&gt;</span><span class="si">{</span><span class="nx">searchQuery</span><span class="si">}</span><span class="p">&lt;/</span><span class="nt">div</span><span class="p">&gt;</span>
    <span class="p">&lt;/</span><span class="nt">div</span><span class="p">&gt;</span>
  <span class="p">);</span>
<span class="p">};</span>
</code></pre></div></div>]]></content><author><name></name></author><summary type="html"><![CDATA[A simple useDebouncedCallback hook in React with TypeScript]]></summary></entry><entry><title type="html">Self hosted password manager using Git and GPG</title><link href="/blog/password-manager" rel="alternate" type="text/html" title="Self hosted password manager using Git and GPG" /><published>2024-03-16T00:00:00+00:00</published><updated>2024-03-16T00:00:00+00:00</updated><id>/blog/password-manager</id><content type="html" xml:base="/blog/password-manager"><![CDATA[<hr />

<p>I have been a long time proponent against using password managers, and the reason for that being I do not want to trust some third party company in storing my passwords properly and securely. And yes, I know that those companies have been in the business for a long while, and that even if their DB does get breached (which happens), the passwords would still be secure (probably). But I would like complete control over that (while also not paying anyone anything).</p>

<p>So instead of using password managers, for a long time I had a system for having <em>almost</em> unique passwords for all the services, while not writing them down anywhere! Essentially, all passwords follow the same template, and then using site information (like the site name for example) to fill that template in. I was quite satisfied with this solution, but it was definitely not perfect. The main reason was that the passwords didn’t differ that much from each other, and another reason was websites with stupid password requirements which would force me to deviate from my password template, and then having to remember that deviation. And of course, being required to change passwords for some things on some set interval (for various security reasons), which was very difficult with this system.</p>

<p>I know about open source password managers that you can self host, like <a href="https://bitwarden.com/">bitwarden</a>. And honestly, you should probably just use that.</p>

<p>But I stumbled upon something a bit more interesting, and a lot more “simple” (simple as in the actual system is simple, but you will spend more time setting this up than using a service). It is the <a href="https://www.passwordstore.org/">pass</a> unix utility. It is super simple, it stores generated passwords in a plain directory, and each password is a gpg encrypted file. And has quite a few options for how the passwords are generated. And that’s it, nothing more.</p>

<p>Since it is a simple directory of files, you can use it as a git repository, and track password changes with it. And it does that for you, so you don’t have to manually commit the changes. And since it’s a git repostory, now you have unlimited options when it comes to hosting your password store. In my case, I use <a href="https://github.com/">github</a>, <a href="https://gitlab.com/">gitlab</a> and my own self hosted <a href="https://gitea.com/">gitea</a> instance as the remotes for the git repo. The repos are private, but even if somehow someone breached those services and got the repo data, it would still be a challenge to decrypt those files.</p>

<p>I’m not going to explain how to set it up, it’s quite simple. There are executables for Windows, macOS and Linux, as well as apps for Android and iOS (which might be a bit more tricky to set up). And of course, there are also browser extensions (<a href="https://github.com/browserpass/browserpass-extension">browserpass</a>), a Windows program (<a href="https://github.com/geluk/pass-winmenu">pass-winmenu</a>), a macOS menu bar app (<a href="https://github.com/adur1990/Pass-for-macOS">Pass-for-macOS</a>) and a cross-platform GUI app (<a href="https://github.com/geluk/pass-winmenu">QtPass</a>) to make using those passwords easier (so you don’t have to open your terminal every time you want to log in somewhere).</p>

<p>I have been using <em>pass</em> for quite some time now (around 2 years), and I am quite happy with it, because it just works, and I am in complete control over the entire process, so if my passwords do get leaked <em>somehow</em>, it will be my own fault.</p>

<p>Now would I recommend using <em>pass</em>? If you’re a normal person, just pay for a password manager, or use the free tier of bitwarden. If you’re a little bit less normal, self host your own bitwarden instance. But if you’re more daring, and like to do things yourself, I would fully recommend pass.</p>

<p>You no longer have an excuse for having bad and insecure passwords, with so many options and approaches to password management, you’re welcome.</p>]]></content><author><name></name></author><summary type="html"><![CDATA[Get complete control over your passwords using the unix pass utility and git]]></summary></entry><entry><title type="html">Expose local services using Reverse SSH Tunnels</title><link href="/blog/reverse-ssh-tunnel" rel="alternate" type="text/html" title="Expose local services using Reverse SSH Tunnels" /><published>2023-10-10T00:00:00+00:00</published><updated>2023-10-10T00:00:00+00:00</updated><id>/blog/reverse-ssh-tunnel</id><content type="html" xml:base="/blog/reverse-ssh-tunnel"><![CDATA[<hr />

<p>If you ever need to temporarily expose a service running on localhost (your new fancy website for example) and you have a server of sorts (let’s say a VPS) that’s publicly accessible from the internet already (since you just love to self host everything), you can use a reverse SSH tunnel to forward your localhost traffic to your server.</p>

<p>Here’s the command:</p>

<div class="language-bash highlighter-rouge"><div class="highlight"><pre class="highlight"><code>ssh <span class="nt">-R</span> 5125:localhost:5000 user@host.com
</code></pre></div></div>

<p>The first port number (5125 in this case) is the port on the remote machine where the traffic will be exposed to. You can then serve traffic from this port in whatever way you like. And the second port is your localhost port on which a service is running on.</p>

<p>This will tunnel the connection between your local machine and the remote server through the SSH connection. And once you kill that session, the tunnel stops.</p>

<p>I of course don’t recommend serving anything like this for long periods of time, at that point you might as well properly host the app on the server directly. One good use case for this is receiving third party API calls. This is a good alternative to using services like <a href="https://ngrok.com/">ngrok</a>.</p>

<p>On my server I am running nginx and simply proxy passing port 5125 on some subdomain like so:</p>

<div class="language-nginx highlighter-rouge"><div class="highlight"><pre class="highlight"><code><span class="k">server</span> <span class="p">{</span>
    <span class="kn">server_name</span> <span class="s">sub.domain.com</span><span class="p">;</span>

    <span class="kn">location</span> <span class="n">/</span> <span class="p">{</span>
        <span class="kn">proxy_pass</span> <span class="s">http://127.0.0.1:5125</span><span class="p">;</span>
        <span class="kn">proxy_set_header</span> <span class="s">X-Forwarded-Host</span> <span class="nv">$host</span><span class="p">;</span>
        <span class="kn">proxy_set_header</span> <span class="s">X-Forwarded-Server</span> <span class="nv">$host</span><span class="p">;</span>
        <span class="kn">proxy_set_header</span> <span class="s">X-Forwarded-Proto</span> <span class="nv">$scheme</span><span class="p">;</span>
        <span class="kn">proxy_set_header</span> <span class="s">X-Forwarded-For</span> <span class="nv">$proxy_add_x_forwarded_for</span><span class="p">;</span>
        <span class="kn">proxy_set_header</span> <span class="s">Host</span> <span class="nv">$host</span><span class="p">;</span>
        <span class="kn">proxy_set_header</span> <span class="s">X-Real-IP</span> <span class="nv">$remote_addr</span><span class="p">;</span>
    <span class="p">}</span>

    <span class="kn">location</span> <span class="n">/robots.txt</span> <span class="p">{</span>
        <span class="kn">return</span> <span class="mi">200</span> <span class="s">"User-agent:</span> <span class="s">*</span><span class="err">\</span><span class="s">nDisallow:</span> <span class="n">/"</span><span class="p">;</span>
    <span class="p">}</span>
<span class="p">}</span>
</code></pre></div></div>

<p>Nothing fancy, passing some headers so my apps work properly, and disallowing search engines to index it.</p>

<p>And that’s it! Now the entire internet can access your absolute masterpiece of a web application!</p>]]></content><author><name></name></author><summary type="html"><![CDATA[A guide on how to expose services running on localhost to the public internet using a reverse SSH tunnel]]></summary></entry><entry><title type="html">Adventures In Highlighting Code In The Browser</title><link href="/blog/highlighting-adventures" rel="alternate" type="text/html" title="Adventures In Highlighting Code In The Browser" /><published>2021-11-05T00:00:00+00:00</published><updated>2021-11-05T00:00:00+00:00</updated><id>/blog/highlighting-adventures</id><content type="html" xml:base="/blog/highlighting-adventures"><![CDATA[<h2 id="preface">Preface</h2>

<p>Highlighting code is easy, but as soon as you need to be able to edit the code, and support a lot of languages (like I don’t know… how about 300+ languages?), and also have <strong>good</strong> highlighting, it gets really hard and confusing.</p>

<p>This post is about my findings on the topic of highlighting code in the browser, my ideas, my attempts and the final solution I decided to go with. There’s most likely a lot of flaws in my approaches, you can leave a comment here if you have thoughts on anything.</p>

<h2 id="motive">Motive</h2>

<p>Let’s start with the motive behind this, why am I looking into a ton of different ways to do code highlighting?</p>

<p>Maybe you know this already, maybe you don’t, but I’m a creator of <a href="https://paste.myst.rs/">pastemyst</a>, a website for sharing code. In the current version (v2) I’m using the <a href="https://codemirror.net">CodeMirror</a> editor, and it’s pretty great, it’s fast, easy to use and supports a bunch of languages. I’m using it both for editing the code and showing the paste to the users.</p>

<p>If CodeMirror is so great, why am I looking at other ways then? Because of basically just one reason, but it’s a big reason. CodeMirror uses pretty simple rules for highlighting, so that’s why it’s fast, but the results aren’t the best.</p>

<p><img src="/assets/images/blog/highlighting-adventures/csharp-pastemyst-vscode.png" alt="difference between pastemyst and vscode highlighting" /></p>

<p>
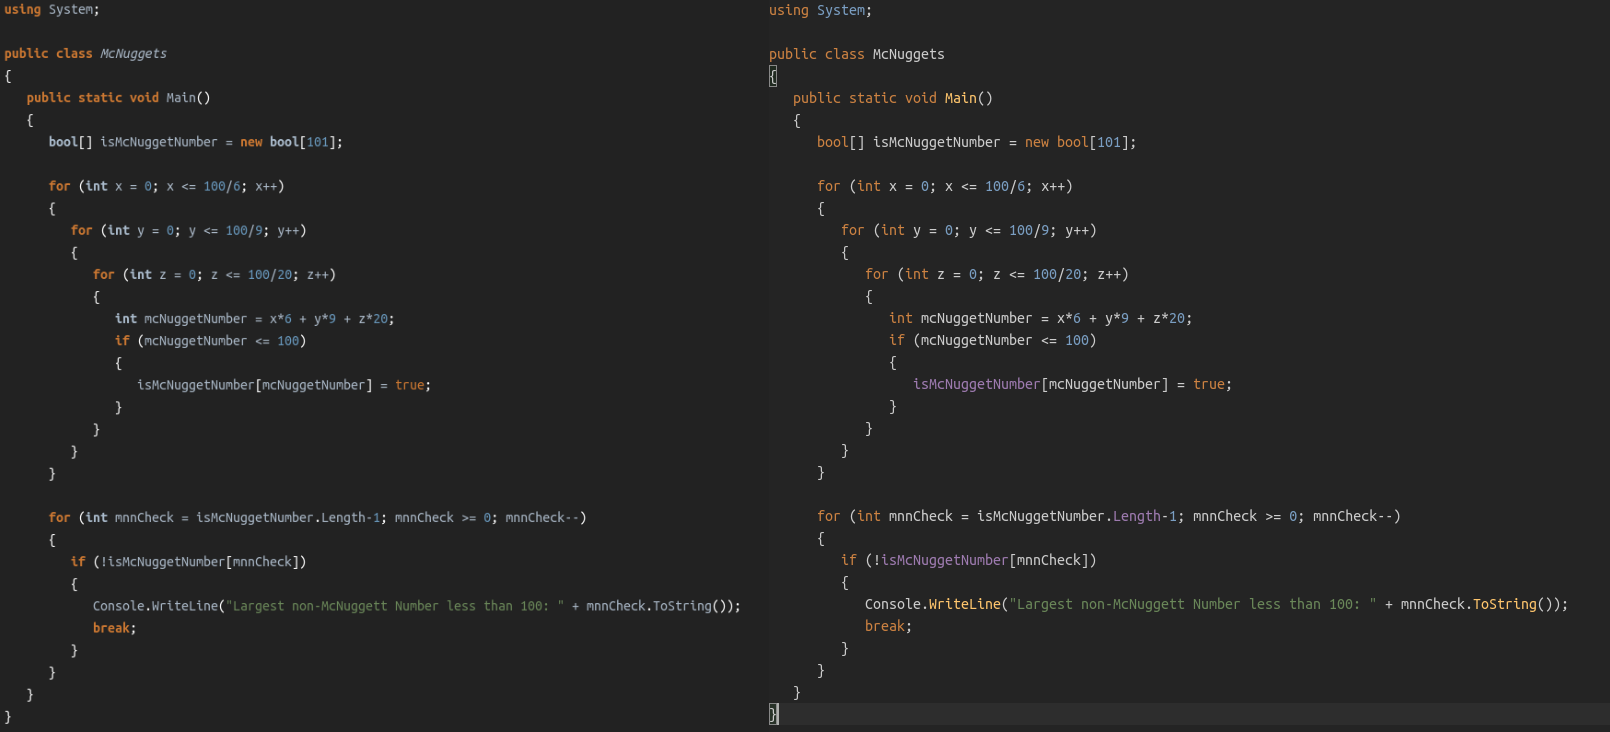
Here you can see the difference between pastemyst (CodeMirror) on the left and VSCode on the right. There’s only slight difference, but I couldn’t be bothered finding a better example.</p>

<p>Having good syntax highlighting on a website based around showing code is pretty important. So I tried finding other ways for syntax highlighting.</p>

<h2 id="textmate-grammars">TextMate grammars</h2>

<p>I first found about <a href="https://macromates.com/manual/en/language_grammars">TextMate language grammars</a>, used by editors like VSCode, Atom, and GitHub as well. The TextMate grammar files are really long, and hard to write, but they tokenize the code much better, and there’s grammar files for a ton of languages already made.</p>

<blockquote>
  <p>NOTE: Atom and parts of GitHub have switched to using <a href="https://tree-sitter.github.io/tree-sitter/">tree-sitter</a>, it works in a different way, and the grammar files are written in JavaScript / CSON. Supposedly you get better highlighting with it, and it’s not as monstrous as TextMate grammars.</p>
</blockquote>

<p>Of course I tried looking for libraries that highlight code based on these grammar files, and found <a href="https://shiki.matsu.io">shiki</a>. It’s an awesome library! It allows you to run the highlighter on a server (node) or in the browser (although you have to do a workaround for loading some wasm file).</p>

<p>But shiki is just a syntax highlighter, and not an editor. And here is where a lot of my problems actually begin. If you just want to show code, and don’t need editing and/or realtime highlighting, just use shiki, but if you do need an editor, then you’re going to have to sacrifice some stuff.</p>

<h2 id="first-approach---separate-editor">First approach - Separate editor</h2>

<p>There are a few ways I thought of on how to deal with this.</p>

<p>The first is the most simple one, continue using CodeMirror for editing the page, and when the users view the paste render it using shiki. This is the easiest to implement, but you will end up having different highlighting in two different places. And yes, you can mitigate this somewhat by using the exact same theme in both places. But there is a bigger issue, CodeMirror just doesn’t support as many languages as I can support with TextMate grammars, the GitHub linguist repository, which has a list of all grammars they use, lists like 370+ languages and CodeMirror lists around 140 languages “built in”. So on a lot of languages you won’t even have any syntax highlighting in the editor, but will get rendered just fine once you make a paste.</p>

<p>And I know you could probably find language definitions for CodeMirror that are missing, but you won’t find a lot of them, and they probably aren’t getting updated anyway. I have a partial solution to this, when you are editing in CodeMirror, add a preview button which when pressed will render using shiki and show the actual result.</p>

<p>Here’s a quick video of this in action, and I know the themes don’t match up, it was a quick demo.</p>

<p><img src="/assets/images/blog/highlighting-adventures/pastemyst-editor-preview.gif" alt="highlighting preview" /></p>

<h2 id="second-approach---custom-editor">Second approach - Custom editor</h2>

<p>The second approach requires a lot more effort. The idea is to use another editor library, one that supports using your own custom highlighter, or make my own editor that does this.</p>

<p>I don’t really want to write my own editor, that kind of stuff is just pain. So I found out about <a href="https://medv.io/codejar/">CodeJar</a>, it’s a small editor that requires you to use your own syntax highlighter.</p>

<p>I wrote a quick demo where I used CodeJar for editing code, there’s actually two editors. One editor highlights code by running shiki in the browser, and the other editor connects to a node server through a websocket, and the server does the rendering.</p>

<p>Let’s look at this image now:</p>

<p><img src="/assets/images/blog/highlighting-adventures/codejar-oneliner.png" alt="codejar editor with one line of code" /></p>

<p>
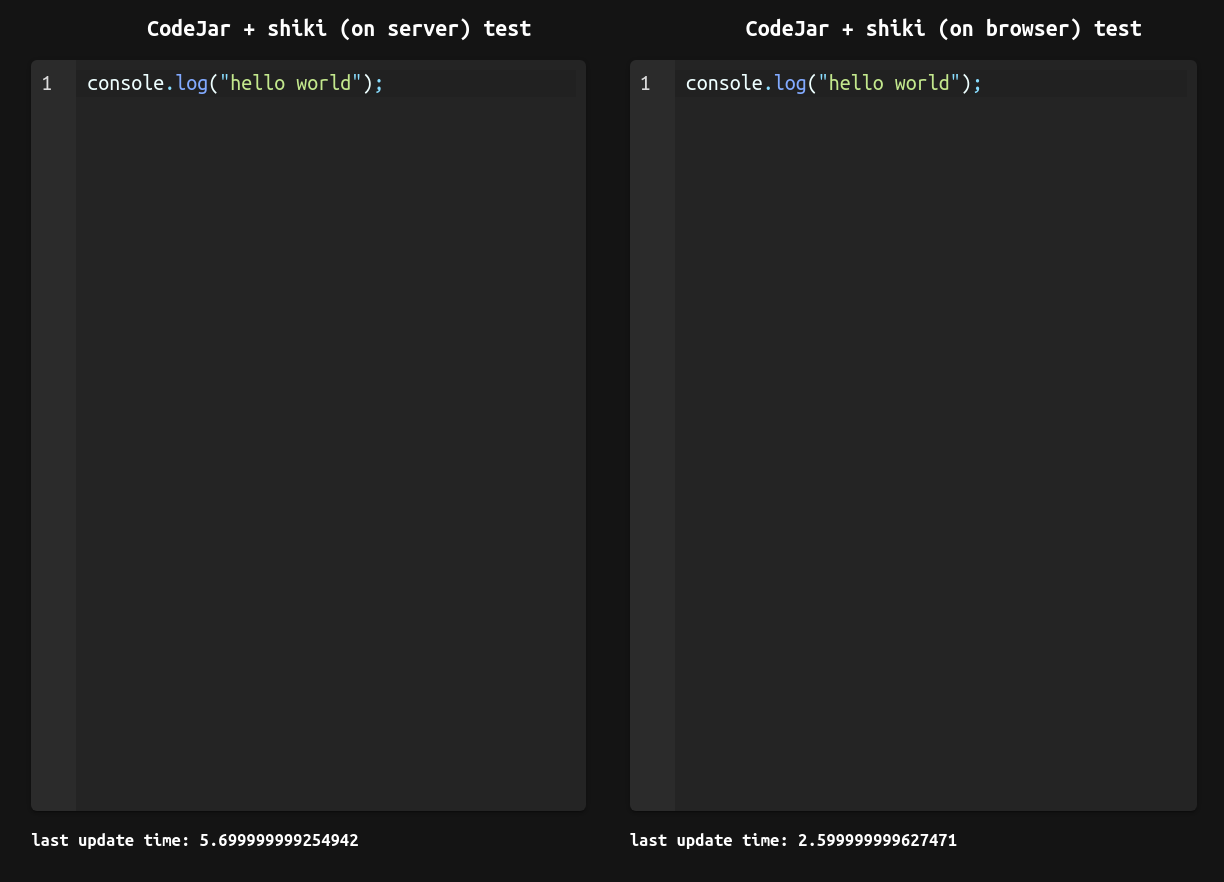
The last update time shows the time in milliseconds that it took CodeJar to update, basically says how long it took to highlight code. And just from this we can see that running shiki in the browser is much faster for some reason.</p>

<p>This is the code that’s running in a node server for this test:</p>

<iframe src="https://paste.myst.rs/6l043c2o/embed" scrolling="no" style="border:none;"></iframe>
<script src="https://paste.myst.rs/static/scripts/libs/iframeResizer.js"></script>
<script>iFrameResize();</script>

<p>And how about a… I don’t know… 10k lines of code?</p>

<p><img src="/assets/images/blog/highlighting-adventures/codejar-10k.png" alt="codejar editor 10k loc" /></p>

<p>
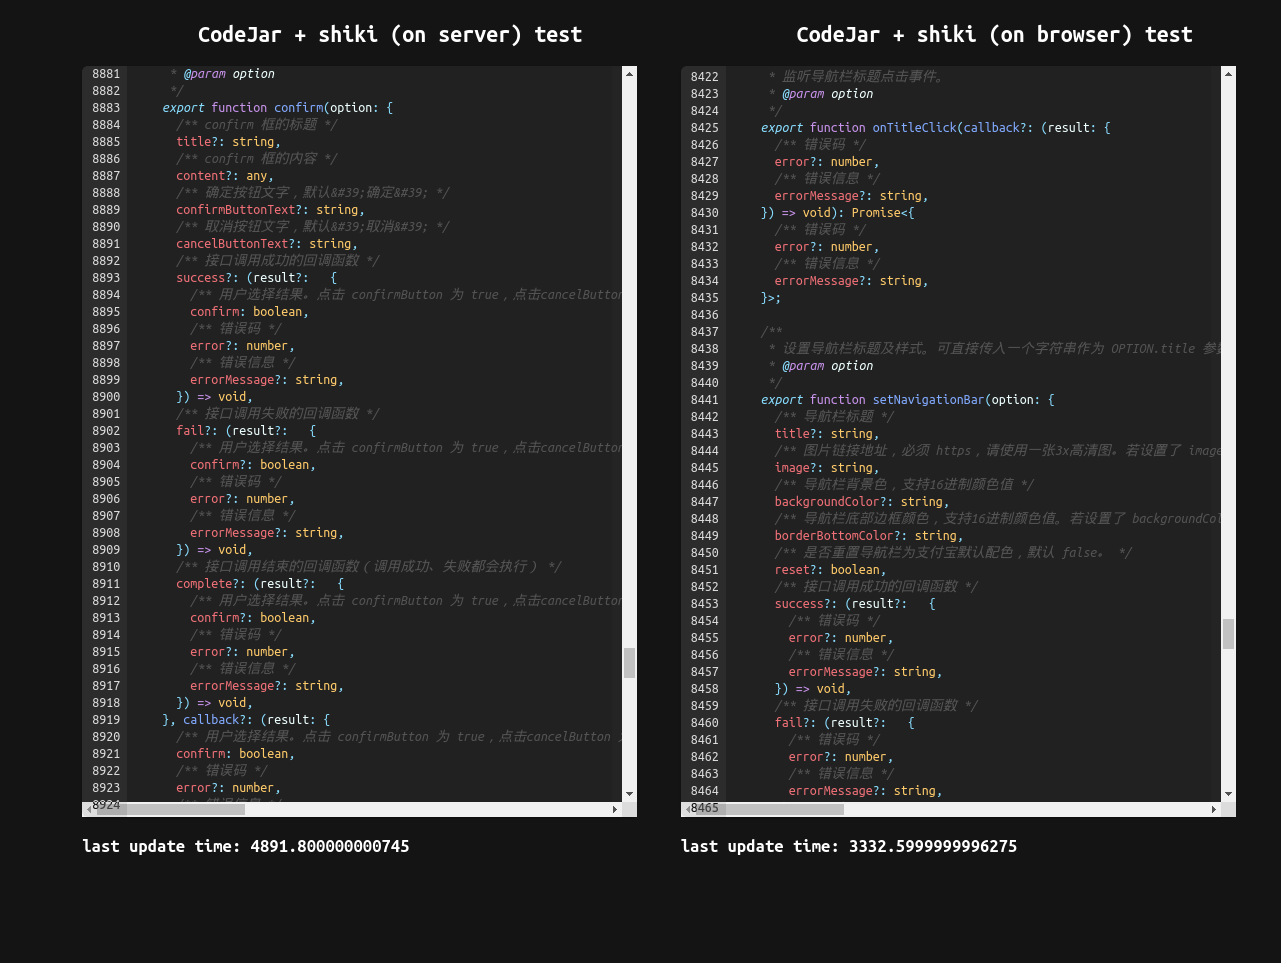
Yup, that’s like 3.5 seconds on the browser test, and when I pasted that in both editors, it took a lot more than 3-4 seconds for it to highlight, it’s <strong>very slow</strong>. And for comparison pasting that into CodeMirror is instant, so yeah… This approach really doesn’t pan out.</p>

<p>Another issue with this approach is loading language files and themes, you don’t really wanna load 370+ json files when you open the website. But I guess a simple solution would be to just load the language once selected, and set a long TTL for caching.</p>

<h2 id="final-words">Final words</h2>

<p>In the end I have decided to go with the first approach, using CodeMirror for editing, and for now use shiki on a server to render code when a paste is viewed. I will also look into trying out tree-sitter and switch between these two depending on the language.</p>

<p>This way I can also cache every grammar file and theme on startup, and maybe even figure out a way to render the paste just once and store the result somewhere (the tricky part is supporting themes).</p>

<p>Now there are other syntax highlighters, like <a href="https://github.com/microsoft/vscode-textmate">vscode-textmate</a>, which is what VSCode uses, but I haven’t tested the performance of that.</p>

<p>There is also another editor which runs in the browser, which actually powers VSCode, <a href="https://microsoft.github.io/monaco-editor/">monaco</a>, but it’s really heavy and doesn’t support mobile. And I don’t think you can easily get more languages supported, but I’m not that sure on that.</p>

<p>And if VSCode can use TextMate grammars for editing, and VSCode is essentially a website bundled into an electron app, there’s probably some way to do fast highlighting for editors. But it requires you to write your own editor, using a lot of tricks probably, and that project alone could take a lot of time, and I simply don’t want to pour a ton of time into something like this, so I’m sticking with the not so elegant approach, but in the end it’s not so bad anyway.</p>

<p>If you have made it this far, thank you for reading! You are of course welcome to leave any thoughts you have here, you can also contact me through mail on my <a href="https://myst.rs/">home page</a>. Until next time.</p>]]></content><author><name></name></author><summary type="html"><![CDATA[A comparison of different ways to do syntax highlighting in the web browser]]></summary></entry><entry><title type="html">Deploying vibe.d apps with GitHub Actions</title><link href="/blog/deploying-vibed" rel="alternate" type="text/html" title="Deploying vibe.d apps with GitHub Actions" /><published>2021-03-16T00:00:00+00:00</published><updated>2021-03-16T00:00:00+00:00</updated><id>/blog/deploying-vibe-d</id><content type="html" xml:base="/blog/deploying-vibed"><![CDATA[<h2 id="backstory">Backstory</h2>

<blockquote>
  <p>If you don’t care for the backstory you can totally skip this chapter. And if you just want the complete script you can scroll to the end.</p>
</blockquote>

<p>Let’s begin with some backstory first. If you do not know who I am, I created <a href="https://paste.myst.rs/">pastemyst</a>, a pastebin clone of sorts (that is actually better than pastebin!). It is hosted on a cheap $5/m Vultr instance (very good VPS host, can recommend, use my referral link if you plan on getting an instance: <a href="https://www.vultr.com/?ref=8377973-6G">Vultr ref</a>), and ever since the huge 2.0 update of pastemyst building the program on that instance with just 1 CPU and 1gb of RAM was impossible because of the scale of the application. The biggest memory usage are the view templates because they get generated at compile time.</p>

<p>There were a couple of solutions to this. First was using swap memory which was a failure, even with the additional 2gb of swap dmd kept crashing with the out of memory error. Next I tried compiling it on my machine and uploading it to the server with scp, but alas, my genius didn’t last for long. I run Arch Linux on my machine (I use arch btw) which of course has every lib that ever existed updated to the most recent version there is, while my server running Ubuntu 18.04 (ancient I know) does not. Curse me and my obsession with being the cool kid who uses Arch (I am cool… right??). The library in issue was glibc, I tried updating it on the server (which can’t build it from source because it’s not very powerful as we established) and installing the same old version on my machine, but couldn’t figure it out. So to the next obvious solution we go.</p>

<p>VMs are a wonderful thing, you can run any OS of any version inside your other <strong>better</strong> OS. I installed the same version of Ubuntu in a VM using qemu, built pastemyst on that and uploaded to the server. And finally it worked! It was a long and painful process but I got pastemyst v2 running on the server and every user was amazed by the new version and my hard work paid off (I still don’t make any money from it though). With this approach it took a while to boot up the VM, and build pastemyst (which still wasn’t blazing fast because it’s a VM) and my upload speed is super slow, so in the end it effectively took around 30 minutes to get a build onto the server, but with no other way in mind I settled with it, I don’t release a new version too frequently anyway. But ha! I found a better way, I bet you couldn’t guess this was going to happen, my genius didn’t reach its limit just yet!</p>

<h2 id="using-github-actions">Using GitHub Actions</h2>

<p>So while being bored one day I realized that hey, I can use the fancy GitHub Actions (which I used so far for building and testing every commit) to also build pastemyst and upload to the server. It took a bit of tinkering but I got it to work and the result is pretty simple.</p>

<p>Let’s go step by step on how I got to the final result. First you will need to create a new workflow script (which is actually just a YAML file… why GitHub, why… <a href="https://blog.atomist.com/in-defense-of-yaml/">relevant article</a>). The workflow files are located in <code class="language-plaintext highlighter-rouge">.github/workflows/</code>.</p>

<p>So do you want to deploy your program on every commit to the main branch? No you don’t, but GitHub has a solution for that! You can set the workflow to execute <code class="language-plaintext highlighter-rouge">on: workflow_dispatch</code> and so you will have a nice big button to press every time you want to deploy. You could make this execute on every new tag / release if you Googled hard enough.</p>

<div class="language-yml highlighter-rouge"><div class="highlight"><pre class="highlight"><code><span class="na">name</span><span class="pi">:</span> <span class="s">Deploy to server</span>

<span class="na">on</span><span class="pi">:</span> <span class="s">workflow_dispatch</span>

<span class="na">jobs</span><span class="pi">:</span>
  <span class="na">deploy</span><span class="pi">:</span>
    <span class="na">name</span><span class="pi">:</span> <span class="s">Deploy to server</span>
    <span class="na">runs-on</span><span class="pi">:</span> <span class="s">ubuntu-18.04</span>
    <span class="na">steps</span><span class="pi">:</span>
      <span class="pi">-</span> <span class="na">uses</span><span class="pi">:</span> <span class="s">actions/checkout@v2</span>
</code></pre></div></div>

<p>Let’s add another step to install D, in this example I’m also downloading the libscrypt dependency and checking out all the submodules (which for some reason requires a third party plugin… why).</p>

<div class="language-yml highlighter-rouge"><div class="highlight"><pre class="highlight"><code><span class="pi">-</span> <span class="na">name</span><span class="pi">:</span> <span class="s">install D</span>
  <span class="na">uses</span><span class="pi">:</span> <span class="s">dlang-community/setup-dlang@v1</span>
  <span class="na">with</span><span class="pi">:</span>
    <span class="na">compiler</span><span class="pi">:</span> <span class="s">dmd-latest</span>
<span class="pi">-</span> <span class="na">name</span><span class="pi">:</span> <span class="s">Install libscrypt</span>
  <span class="na">run</span><span class="pi">:</span> <span class="pi">|</span>
    <span class="s">sudo apt-get install libscrypt0</span>
    <span class="s">sudo apt-get install libscrypt-dev</span>
<span class="pi">-</span> <span class="na">name</span><span class="pi">:</span> <span class="s">Checkout submodules</span>
  <span class="na">uses</span><span class="pi">:</span> <span class="s">srt32/git-actions@v0.0.3</span>
  <span class="na">with</span><span class="pi">:</span>
    <span class="na">args</span><span class="pi">:</span> <span class="s">git submodule update --init --recursive</span>
</code></pre></div></div>

<p>Time to now build the project in release mode.</p>

<div class="language-yml highlighter-rouge"><div class="highlight"><pre class="highlight"><code><span class="pi">-</span> <span class="na">name</span><span class="pi">:</span> <span class="s">build</span>
  <span class="na">run</span><span class="pi">:</span> <span class="s">dub build -b release</span>
</code></pre></div></div>

<p>Now the interesting part. There’s two more steps, copy the resulting binary to the server, and then ssh into the server and move the binary to the right place and then run git pull to get all necessary assets like css and stuff.</p>

<p>You should generate an SSH key on your local machine like so:</p>

<div class="language-sh highlighter-rouge"><div class="highlight"><pre class="highlight"><code>ssh-keygen <span class="nt">-t</span> rsa <span class="nt">-b</span> 4096 <span class="nt">-C</span> <span class="s2">"your@mail"</span>
</code></pre></div></div>

<p>When you execute the command it will ask you for the path, as you will use this SSH key just for the GitHub action make sure not to leave it as a default or it might overwrite your existing SSH key (you can delete the key from your local machine after you have this setup).</p>

<p>This is now a very important part, when it asks you for a passphrase leave it empty, I learned this the hard way after many times asking myself why isn’t this working???? (I think you can set a passphrase and then provide a passphrase key to the action but I haven’t tested this).</p>

<p>Go copy the public key and add it to your <code class="language-plaintext highlighter-rouge">~/.ssh/authorized_keys</code> files on your server, this allows anyone with the private key that matches the provided public key to ssh into the server, and in this case GitHub.</p>

<p>Now you should go into your GitHub repo, go to settings and open the Secrets section. You should add a new secret for the SSH username, host, port and private key. The SSH_SECRET should contain the private key you got from generating the SSH key.</p>

<p><img src="/assets/images/blog/deploying-vibe-d/github-secrets.png" alt="github secrets" /></p>

<p>We can now add the SCP step to the workflow.</p>

<div class="language-yml highlighter-rouge"><div class="highlight"><pre class="highlight"><code><span class="pi">-</span> <span class="na">name</span><span class="pi">:</span> <span class="s">upload to server</span>
  <span class="na">uses</span><span class="pi">:</span> <span class="s">appleboy/scp-action@master</span>
  <span class="na">with</span><span class="pi">:</span>
    <span class="na">host</span><span class="pi">:</span> <span class="s">$</span>
    <span class="na">username</span><span class="pi">:</span> <span class="s">$</span>
    <span class="na">key</span><span class="pi">:</span> <span class="s">$</span>
    <span class="na">port</span><span class="pi">:</span> <span class="s">$</span>
    <span class="na">source</span><span class="pi">:</span> <span class="s2">"</span><span class="s">bin/pastemyst"</span>
    <span class="na">target</span><span class="pi">:</span> <span class="s2">"</span><span class="s">builds"</span>
</code></pre></div></div>

<p>The source and target fields are weird, with the way I set them up from the example the binary ends up in <code class="language-plaintext highlighter-rouge">builds/bin/pastemyst</code> for some reason, but oh well, we are going to SSH into the server and move it anyway.</p>

<p>And for the final step.</p>

<div class="language-yml highlighter-rouge"><div class="highlight"><pre class="highlight"><code><span class="pi">-</span> <span class="na">name</span><span class="pi">:</span> <span class="s">move binary and pull repo</span>
  <span class="na">uses</span><span class="pi">:</span> <span class="s">appleboy/ssh-action@master</span>
  <span class="na">with</span><span class="pi">:</span>
    <span class="na">host</span><span class="pi">:</span> <span class="s">$</span>
    <span class="na">username</span><span class="pi">:</span> <span class="s">$</span>
    <span class="na">key</span><span class="pi">:</span> <span class="s">$</span>
    <span class="na">port</span><span class="pi">:</span> <span class="s">$</span>
    <span class="na">script</span><span class="pi">:</span> <span class="pi">|</span>
      <span class="s">rm pastemyst/pastemyst</span>
      <span class="s">mv builds/bin/pastemyst pastemyst/pastemyst</span>
      <span class="s">cd pastemyst</span>
      <span class="s">git pull origin main</span>
</code></pre></div></div>

<p>The script first deletes the current binary file, then it moves the new one to the right place and finally pulls the repo.</p>

<p>You should now have a “Run workflow” button when you go to Actions -&gt; Deploy to server -&gt; Run  workflow</p>

<p><img src="/assets/images/blog/deploying-vibe-d/run-workflow.png" style="width: 350px;" /></p>

<p>If you did everything correctly your new program will now deploy super fast and you shouldn’t need to do anything else (except maybe do <code class="language-plaintext highlighter-rouge">systemctl restart service</code>, but that can also be added to the script). But of course it won’t work first try and you will end up with 10 commits saying “updated deploy script” and 10 failed workflow runs, but CI/CD do be like that.</p>

<p><img src="/assets/images/blog/deploying-vibe-d/failed-runs.png" alt="failed runs" /></p>

<p>Also big thanks to GitHub for allowing us to run bad code on their servers for free.</p>

<h2 id="full-workflow">Full workflow</h2>

<p>Here’s the full workflow script for all your lazy people (or people who just want to get stuff done fast). And it’s displayed using a pastemyst embed just to flex this amazing feature you should definitely use (if the script doesn’t actually load let’s just say this was the comedic part of the post).</p>

<iframe src="https://paste.myst.rs/mjoufaht/embed" scrolling="no" style="border:none;"></iframe>
<script src="https://paste.myst.rs/static/scripts/libs/iframeResizer.js"></script>
<script>iFrameResize();</script>]]></content><author><name></name></author><summary type="html"><![CDATA[Guide on how to deploy vibe.d web applications to your server using GitHub Actions]]></summary></entry></feed>